1. TextBlock
- Margin : 상하좌우로 공간을 띄워줌
- TextTrimming : 문장을 나타낼 방법을 정해줌
- Foreground : 글자 색을 지정해줌
- <LineBreak /> : 줄 바꿈을 해줌
[XAML]
<Window x:Class="StudyWPF.MainWindow"
        xmlns="http://schemas.microsoft.com/winfx/2006/xaml/presentation"
        xmlns:x="http://schemas.microsoft.com/winfx/2006/xaml"
        xmlns:d="http://schemas.microsoft.com/expression/blend/2008"
        xmlns:mc="http://schemas.openxmlformats.org/markup-compatibility/2006"
        xmlns:local="clr-namespace:StudyWPF"
        mc:Ignorable="d"
        Title="MainWindow" Height="200" Width="250">
    <StackPanel>
        <!--Margin를 이용해 상하좌우로 남길 공간을 만들 수 있다.
        Foreground를 이용해 글자색을 지정할 수 있다.-->
        <TextBlock Margin="10" Foreground="Red">
            TextBlock의 "LineBreak" 기능을 이용해 <LineBreak />
            문장을 여러 줄로 나눌 수 있다.
        </TextBlock>
        <TextBlock Margin="10" TextTrimming="CharacterEllipsis" Foreground="Green">
            "TextTrimming"을 "CharacterEllipsis"로 지정하면 남은 문장을 생략형으로 표현해준다.
        </TextBlock>
        <TextBlock Margin="10" TextWrapping="Wrap" Foreground="Blue">
            "TextWrapping"을 "Wrap"로 지정하면 자동으로 줄을 나누어준다.
        </TextBlock>
    </StackPanel>
</Window>
[결과]

2. TextBlock - 대표 Inline 기능들
- <Bold></Bold> : 굵게 표시
- <Italic></Italic> : 기울임체 표시
- <underline></underline> : 밑줄 표시
[XAML]
<Window x:Class="StudyWPF.MainWindow"
        xmlns="http://schemas.microsoft.com/winfx/2006/xaml/presentation"
        xmlns:x="http://schemas.microsoft.com/winfx/2006/xaml"
        xmlns:d="http://schemas.microsoft.com/expression/blend/2008"
        xmlns:mc="http://schemas.openxmlformats.org/markup-compatibility/2006"
        xmlns:local="clr-namespace:StudyWPF"
        mc:Ignorable="d"
        Title="MainWindow" Height="200" Width="300">
    <StackPanel>
        <TextBlock Margin="10">
            "Bold"를 이용해 <Bold>"굵게"</Bold> 표시 가능 <LineBreak/>
            "Italic"을 이용해 <Italic>"기울임체"</Italic> 표시 가능 <LineBreak/>
            "Underline"을 이용해 <Underline>"밑줄"</Underline> 표시 가능
        </TextBlock>
    </StackPanel>
</Window>
[결과]
3. TextBlock - Hyperlink 기능
<Hyperlink></Hyperlink> : 하이퍼링크 생성
- RequestNavigate="Hyperlink_RequestNavigate" : 이벤트 함수 등록(이벤트 함수는 CodeBehind에서 정의)
- NavigateUri="https://www.google.com" : uri 입력
[XAML]
<Window x:Class="StudyWPF.MainWindow"
        xmlns="http://schemas.microsoft.com/winfx/2006/xaml/presentation"
        xmlns:x="http://schemas.microsoft.com/winfx/2006/xaml"
        xmlns:d="http://schemas.microsoft.com/expression/blend/2008"
        xmlns:mc="http://schemas.openxmlformats.org/markup-compatibility/2006"
        xmlns:local="clr-namespace:StudyWPF"
        mc:Ignorable="d"
        Title="MainWindow" Height="200" Width="300">
    <StackPanel>
        <TextBlock Margin="10" TextWrapping="Wrap">
            "Hyperlink"의 "RequestNavigate"에 이벤트를 넣어주어 <Hyperlink RequestNavigate="Hyperlink_RequestNavigate" NavigateUri="https://www.google.com">하이퍼링크</Hyperlink>를 만들 수 있다.
        </TextBlock>
    </StackPanel>
</Window>
[Code-behind(이벤트 함수 정의)]
using System;
using System.Collections.Generic;
using System.Linq;
using System.Text;
using System.Threading.Tasks;
using System.Windows;
using System.Windows.Controls;
using System.Windows.Data;
using System.Windows.Documents;
using System.Windows.Input;
using System.Windows.Media;
using System.Windows.Media.Imaging;
using System.Windows.Navigation;
using System.Windows.Shapes;

namespace StudyWPF
{
    /// <summary>
    /// MainWindow.xaml에 대한 상호 작용 논리
    /// </summary>
    public partial class MainWindow : Window
    {
        public MainWindow()
        {
            InitializeComponent();
        }

        private void Hyperlink_RequestNavigate(Object sender, RequestNavigateEventArgs e)
        {
            // uri를 실행시킴
            System.Diagnostics.Process.Start(e.Uri.AbsoluteUri);
        }
    }
}
[결과]
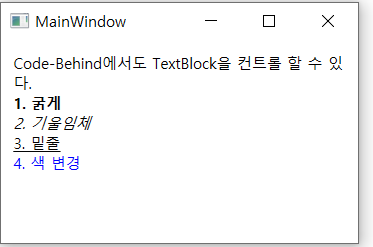
4. Code-Behind에서 TextBlock 컨트롤
- XAML을 변경하지 않고 Code-Behind 만으로도 TextBlock 생성 및 변경이 가능하다.
- 다만, XAML을 이용하는 것이 더 편할 뿐..
[Code-Behind]
using System;
using System.Collections.Generic;
using System.Linq;
using System.Text;
using System.Threading.Tasks;
using System.Windows;
using System.Windows.Controls;
using System.Windows.Data;
using System.Windows.Documents;
using System.Windows.Input;
using System.Windows.Media;
using System.Windows.Media.Imaging;
using System.Windows.Navigation;
using System.Windows.Shapes;

namespace StudyWPF
{
    /// <summary>
    /// MainWindow.xaml에 대한 상호 작용 논리
    /// </summary>
    public partial class MainWindow : Window
    {
        public MainWindow()
        {
            InitializeComponent();

            TextBlock tb = new TextBlock(); // TextBlock 생성

            tb.TextWrapping = TextWrapping.Wrap; // 자동으로 줄 바꿈 해주는 Wrap 기능 설정
            tb.Margin = new Thickness(10); // Margin 설정(상하좌우 빈공간)

            // Inline 코드들
            tb.Inlines.Add("Code-Behind에서도 TextBlock을 컨트롤 할 수 있다.");
            tb.Inlines.Add(new LineBreak());
            tb.Inlines.Add(new Run("1. 굵게") { FontWeight = FontWeights.Bold });
            tb.Inlines.Add(new LineBreak());
            tb.Inlines.Add(new Run("2. 기울임체") { FontStyle = FontStyles.Italic });
            tb.Inlines.Add(new LineBreak());
            tb.Inlines.Add(new Run("3. 밑줄") { TextDecorations = TextDecorations.Underline });
            tb.Inlines.Add(new LineBreak());
            tb.Inlines.Add(new Run("4. 색 변경") { Foreground = Brushes.Blue });

            this.Content = tb; // 윈도우에 생성한 TextBlock을 넣어줌
        }
    }
}
[결과]
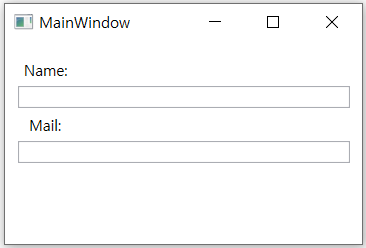
5. Label
- Content에 문자열을 담음
- [Alt]키를 누른 상태에서 컨트롤을 지정한 특정 문자를 누르면 해당 컨트롤에 접근하여 사용할 수 있음
- 문자열에 첫번째 하이픈('_') 뒤에 있는 문자가 키 값으로 지정됨
- Binding으로 키 값으로 접근할 컨트롤을 지정함(ElementName을 이용해 이름으로 컨트롤을 지정)
[XAML]
<Window x:Class="StudyWPF.MainWindow"
xmlns="http://schemas.microsoft.com/winfx/2006/xaml/presentation"
xmlns:x="http://schemas.microsoft.com/winfx/2006/xaml"
xmlns:d="http://schemas.microsoft.com/expression/blend/2008"
xmlns:mc="http://schemas.openxmlformats.org/markup-compatibility/2006"
xmlns:local="clr-namespace:StudyWPF"
mc:Ignorable="d"
Title="MainWindow" Height="200" Width="300">
<StackPanel Margin="10">
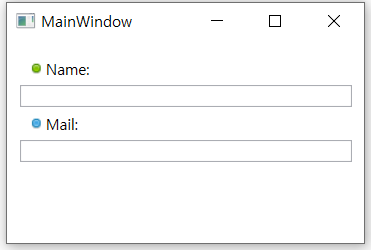
<Label Content="_Name:" Target="{Binding ElementName=txtName}" />
<TextBox Name="txtName" />
<Label Content=" _Mail: " Target="{Binding ElementName=txtMail}" />
<TextBox Name="txtMail" />
</StackPanel>
</Window>[결과]
-왼쪽 : [alt] 누르기 전 기본 상태, 오른쪽 : [alt] 누른 상태
- alt + n 또는 alt + m 을 누르면 해당 TextBox로 커서가 이동함
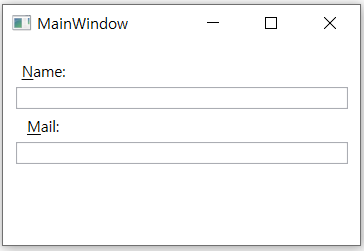
- 이미지와 같이 문자 외의 컨트롤도 넣을 수 있음
[XAML]
<Window x:Class="StudyWPF.MainWindow"
        xmlns="http://schemas.microsoft.com/winfx/2006/xaml/presentation"
        xmlns:x="http://schemas.microsoft.com/winfx/2006/xaml"
        xmlns:d="http://schemas.microsoft.com/expression/blend/2008"
        xmlns:mc="http://schemas.openxmlformats.org/markup-compatibility/2006"
        xmlns:local="clr-namespace:StudyWPF"
        mc:Ignorable="d"
        Title="MainWindow" Height="200" Width="300">
    <StackPanel Margin="10">
        <Label Target="{Binding ElementName=txtName}">
            <StackPanel Orientation="Horizontal">
                <Image Source="http://cdn1.iconfinder.com/data/icons/fatcow/16/bullet_green.png"/>
                <AccessText Text="N_ame:" />
            </StackPanel>
        </Label>
        <TextBox Name="txtName" />
        <Label Target="{Binding ElementName=txtMail}">
            <StackPanel Orientation="Horizontal">
                <Image Source="http://cdn1.iconfinder.com/data/icons/fatcow/16/bullet_blue.png"/>
                <AccessText Text="_Mail:" />
            </StackPanel>
        </Label>
        <TextBox Name="txtMail" />
    </StackPanel>
</Window>
[결과]
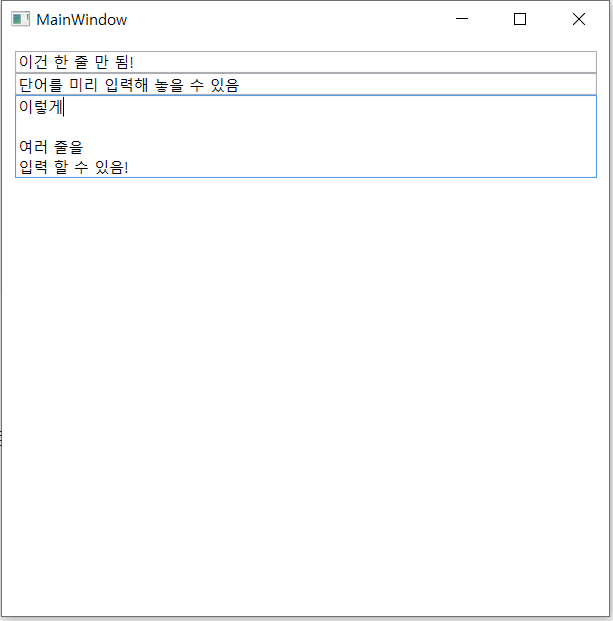
6. TextBox
- <TextBox /> : 한 줄 입력 가능
- Text 특성을 이용해 미리 문자열을 입력해 놓을 수 있음
- AcceptsReturn 특성을 True로 하면 여러 줄을 입력 가능
- SpellCheck 특성을 True로 하고, Language 특성으로 언어 설정을 하면 맞춤법 검사를 할 수 있음(근데 안됨..)
[XAML]
<Window x:Class="StudyWPF.MainWindow"
        xmlns="http://schemas.microsoft.com/winfx/2006/xaml/presentation"
        xmlns:x="http://schemas.microsoft.com/winfx/2006/xaml"
        xmlns:d="http://schemas.microsoft.com/expression/blend/2008"
        xmlns:mc="http://schemas.openxmlformats.org/markup-compatibility/2006"
        xmlns:local="clr-namespace:StudyWPF"
        mc:Ignorable="d"
        Title="MainWindow" Height="500" Width="500">
    <StackPanel Margin="10">
        <!--한 줄 입력 가능-->
        <TextBox/>
        <TextBox Text="단어를 미리 입력해 놓을 수 있음" />
        <!--여러 줄 입력 가능-->
        <TextBox AcceptsReturn="True" TextWrapping="Wrap"/>
    </StackPanel>
</Window>
[결과]
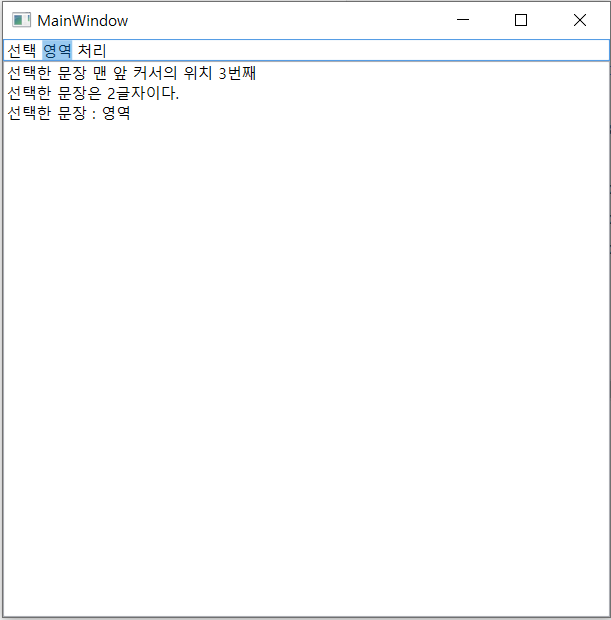
7. TextBox - 선택한 영역 처리
[XAML]
- 첫번째 TextBox는 사용자 입력을 받을 곳 -> SelectionChanged에 이벤트 함수를 연결해줌
- 두번째 TextBox는 이벤트 함수에 대한 결과를 출력할 곳 -> 결과를 임의로 수정하면 안되므로 IsReadOnly 특성을 True로 하여 읽기전용으로 만듦!
<Window x:Class="StudyWPF.MainWindow"
        xmlns="http://schemas.microsoft.com/winfx/2006/xaml/presentation"
        xmlns:x="http://schemas.microsoft.com/winfx/2006/xaml"
        xmlns:d="http://schemas.microsoft.com/expression/blend/2008"
        xmlns:mc="http://schemas.openxmlformats.org/markup-compatibility/2006"
        xmlns:local="clr-namespace:StudyWPF"
        mc:Ignorable="d"
        Title="MainWindow" Height="500" Width="500">
    <DockPanel>
        <!--선택 영역 처리-->
        <TextBox SelectionChanged="TextBox_SelectionChanged" DockPanel.Dock="Top" />
        <TextBox Name="txtStatus" AcceptsReturn="True" TextWrapping="Wrap" IsReadOnly="True"/>
    </DockPanel>
</Window>
[Code-Behind]
- 이벤트 함수를 작성
- SelectionStart : 현재 커서의 위치 또는 선택 항목이 있는 경우, 선택 블록의 시작점을 나타냄
- SelectionLength : 현재 선택 영역의 길이
- SelectedText : 현재 선택한 영역의 문자열
using System;
using System.Collections.Generic;
using System.Linq;
using System.Text;
using System.Threading.Tasks;
using System.Windows;
using System.Windows.Controls;
using System.Windows.Data;
using System.Windows.Documents;
using System.Windows.Input;
using System.Windows.Media;
using System.Windows.Media.Imaging;
using System.Windows.Navigation;
using System.Windows.Shapes;

namespace StudyWPF
{
    /// <summary>
    /// MainWindow.xaml에 대한 상호 작용 논리
    /// </summary>
    public partial class MainWindow : Window
    {
        public MainWindow()
        {
            InitializeComponent();
        }

        private void TextBox_SelectionChanged(object sender, RoutedEventArgs e)
        {
            TextBox textBox = sender as TextBox;

            txtStatus.Text = "선택한 문장 맨 앞 커서의 위치 " + textBox.SelectionStart + "번째" + Environment.NewLine;
            txtStatus.Text += "선택한 문장은 " + textBox.SelectionLength + "글자이다." + Environment.NewLine;
            txtStatus.Text += "선택한 문장 : " + textBox.SelectedText + "";
        }
    }
}
[결과]
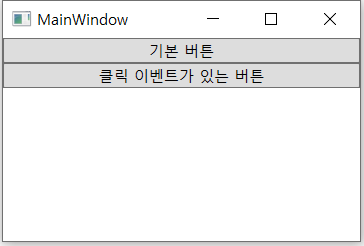
8. Button
- <Button>내용</Button> : 내용의 이름을 가진 버튼 생성
- Click 특성에 이벤트 함수를 연결해 클릭 시 이벤트를 만들 수 있음
[XAML]
<Window x:Class="StudyWPF.MainWindow"
        xmlns="http://schemas.microsoft.com/winfx/2006/xaml/presentation"
        xmlns:x="http://schemas.microsoft.com/winfx/2006/xaml"
        xmlns:d="http://schemas.microsoft.com/expression/blend/2008"
        xmlns:mc="http://schemas.openxmlformats.org/markup-compatibility/2006"
        xmlns:local="clr-namespace:StudyWPF"
        mc:Ignorable="d"
        Title="MainWindow" Height="200" Width="300">
    <StackPanel>
        <Button>기본 버튼</Button>
        <Button Click="Button_Click">클릭 이벤트가 있는 버튼</Button>
    </StackPanel>
</Window>
[Code-Behind]
using System;
using System.Collections.Generic;
using System.Linq;
using System.Text;
using System.Threading.Tasks;
using System.Windows;
using System.Windows.Controls;
using System.Windows.Data;
using System.Windows.Documents;
using System.Windows.Input;
using System.Windows.Media;
using System.Windows.Media.Imaging;
using System.Windows.Navigation;
using System.Windows.Shapes;

namespace StudyWPF
{
    /// <summary>
    /// MainWindow.xaml에 대한 상호 작용 논리
    /// </summary>
    public partial class MainWindow : Window
    {
        public MainWindow()
        {
            InitializeComponent();
        }

        private void Button_Click(object sender, RoutedEventArgs e)
        {
            MessageBox.Show("클릭 이벤트 발생!");
        }
    }
}
[결과]
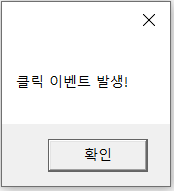
- 왼쪽 : 생성한 버튼
- 오른쪽 : 클릭 이벤트가 있는 버튼을 눌렀을 때 생성된 이벤트 메세지 창
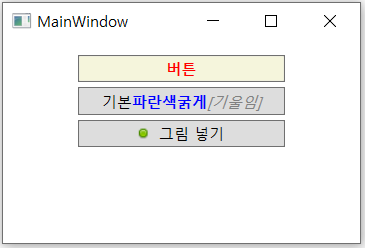
9. Button - 고급 특성
- Background 특성을 이용해 뒷 배경색을 지정할 수 있음
- Foreground 특성을 이용해 글자 색을 지정할 수 있음
- FontWeight 특성을 이용해 글자의 굵기를 지정할 수 있음
- Image의 Source라는 특성을 이용해 uri를 연결하여 그림을 가져올 수 있음
- Padding 특성을 이용해 여백을 생성할 수 있음
- Window Resources를 이용해 전체 특성을 한 번에 적용할 수 있음
[XAML]
<Window x:Class="StudyWPF.MainWindow"
        xmlns="http://schemas.microsoft.com/winfx/2006/xaml/presentation"
        xmlns:x="http://schemas.microsoft.com/winfx/2006/xaml"
        xmlns:d="http://schemas.microsoft.com/expression/blend/2008"
        xmlns:mc="http://schemas.openxmlformats.org/markup-compatibility/2006"
        xmlns:local="clr-namespace:StudyWPF"
        mc:Ignorable="d"
        Title="MainWindow" Height="200" Width="300">
    <StackPanel Margin="10">
        <Button Background="Beige" Foreground="Red" FontWeight="Bold">버튼</Button>

        <Button>
            <StackPanel Orientation="Horizontal">
                <TextBlock>기본</TextBlock>
                <TextBlock Foreground="Blue" FontWeight="Bold" >파란색굵게</TextBlock>
                <TextBlock Foreground="Gray" FontStyle="Italic">[기울임]</TextBlock>
            </StackPanel>
        </Button>

        <Button >
            <StackPanel Orientation="Horizontal">
                <Image Source="http://cdn1.iconfinder.com/data/icons/fatcow/16/bullet_green.png"/>
                <TextBlock Margin="5,0">그림 넣기</TextBlock>
            </StackPanel>
        </Button>
    </StackPanel>

    <!--윈도우 전체에 특성을 적용해줌-->
    <Window.Resources>
        <Style TargetType="{x:Type Button}">
            <!--좌우로 5픽셀 패딩, 상하로 2픽셀 패딩-->
            <Setter Property="Padding" Value="5,2" />
            <!--여백을 버튼 좌우로 50픽셀, 상하로 2픽셀 생성함-->
            <Setter Property="Margin" Value="50, 2"/>
        </Style>
    </Window.Resources>
</Window>
[결과]