1. 데이터 바인딩
- 두 개의 데이터/ 정보에 대한 소스를 결합하고 데이터 동기화를 유지하는 기술
- source와 destination UI 구성간에 바인딩을 주로 함
- {Binding} 이렇게 중괄호 사이에 넣어서 사용
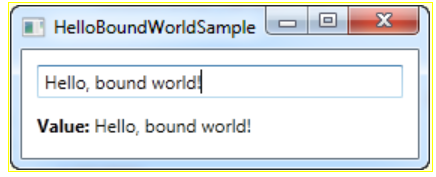
[예제]
<Window x:Class="WpfTutorialSamples.DataBinding.HelloBoundWorldSample"
        xmlns="http://schemas.microsoft.com/winfx/2006/xaml/presentation"
        xmlns:x="http://schemas.microsoft.com/winfx/2006/xaml"
        Title="HelloBoundWorldSample" Height="110" Width="280">
    <StackPanel Margin="10">
		<TextBox Name="txtValue" />
		<WrapPanel Margin="0,10">
			<TextBlock Text="Value: " FontWeight="Bold" />
			<TextBlock Text="{Binding Path=Text, ElementName=txtValue}" />
		</WrapPanel>
	</StackPanel>
</Window>
[결과]
- TextBox의 Name을 txtValue로 설정
- TextBlock의 Text에 바인딩을 시킴 => Binding Path를 Text로 연결 + ElementName을 txtValue로 설정
=> TextBlock의 Text가 현재 바인딩 하고 있는 TextBox에 사용자가 적은 Text가 그대로 연결되어 나옴
1-1. DataContext
- 바인딩의 기본 소스
- 기본 설정값은 따로 없음(모두 null 값을 가짐)
[예제]
1) XAML
<Window x:Class="WpfTutorialSamples.DataBinding.DataContextSample"
        xmlns="http://schemas.microsoft.com/winfx/2006/xaml/presentation"
        xmlns:x="http://schemas.microsoft.com/winfx/2006/xaml"
        Title="DataContextSample" Height="130" Width="280">
	<StackPanel Margin="15">
		<WrapPanel>
			<TextBlock Text="Window title:  " />
			<TextBox Text="{Binding Title, UpdateSourceTrigger=PropertyChanged}" Width="150" />
		</WrapPanel>

		<WrapPanel Margin="0,10,0,0">
			<TextBlock Text="Window dimensions: " />
			<TextBox Text="{Binding Width}" Width="50" />
			<TextBlock Text=" x " />
			<TextBox Text="{Binding Height}" Width="50" />
		</WrapPanel>
	</StackPanel>
</Window>
2) Code-Behind
using System;
using System.Windows;
namespace WpfTutorialSamples.DataBinding
{
public partial class DataContextSample : Window
{
public DataContextSample()
{
InitializeComponent();
// DataContext의 내용을 자기자신의 내용으로 함
this.DataContext = this;
}
}
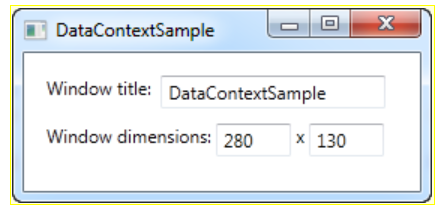
}3) 결과
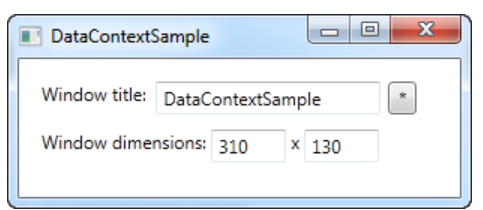
- 첫번째 WrapPanel의 TextBox의 Text는 Title에 연결됨
- 두번째 WrapPanel의 첫번째 TextBox의 Text는 Width에 연결되고 두번째 TextBox의 Text는 Height에 연결됨
- Code-Behind에서 Context의 내용은 자기자신으로 정의하였으므로, 각 Title과 Width, Height는 자기자신의 것과 연결되어 화면에 자기자신의 Title, Width, Height가 보여지게 된다.
1-2. Code-Behind로 바인딩
- Binding 인스턴스를 만들어 작동 -> 생성자에서 직접 원하는 경로를 지정
(ex) Binding b = new Binding("Text");
- 소스를 지정해야 함(바인딩 할 대상)
- 실제 연결 -> SetBinding 이용 -> 바인딩하는 자신의 속성과 바인딩 인스턴스를 매개 변수로 받음
[예제]
1) xaml
<Window x:Class="WpfTutorialSamples.DataBinding.CodeBehindBindingsSample"
    xmlns="http://schemas.microsoft.com/winfx/2006/xaml/presentation"
    xmlns:x="http://schemas.microsoft.com/winfx/2006/xaml"
    Title="CodeBehindBindingsSample" Height="110" Width="280">
    <StackPanel Margin="10">
    	<TextBox Name="txtValue" />

    <WrapPanel Margin="0,10">
        <TextBlock Text="Value: " FontWeight="Bold" />
        <TextBlock Name="lblValue" />
    </WrapPanel>
    </StackPanel>
</Window>
2) code-behind
using System;
using System.Windows;
using System.Windows.Controls;
using System.Windows.Data;
namespace WpfTutorialSamples.DataBinding
{
public partial class CodeBehindBindingsSample : Window
{
public CodeBehindBindingsSample()
{
InitializeComponent();
Binding binding = new Binding("Text"); // 바인딩 인스턴스 생성
binding.Source = txtValue; // 소스 연결
lblValue.SetBinding(TextBlock.TextProperty, binding); // 실제 바인딩
}
}
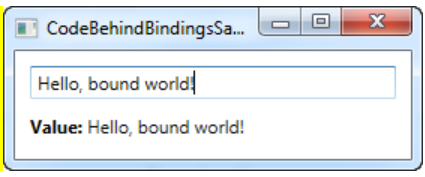
}3) 결과
- Text 속성의 바인딩 인스턴스 생성
- TextBox txtValue를 소스로 연결
- TextBlock lblValue에 바인딩
1-3. UpdateSourceTrigger 속성
- 변경된 내용이 반영되는 것을 조절함
- Defult가 기본값, 다른 옵션들로는 PropertyChanged, LostFocus, Explicit 이 있음
[예제]
1) xaml
<Window x:Class="WpfTutorialSamples.DataBinding.DataContextSample"
        xmlns="http://schemas.microsoft.com/winfx/2006/xaml/presentation"
        xmlns:x="http://schemas.microsoft.com/winfx/2006/xaml"
        Title="DataContextSample" Height="130" Width="310">
	<StackPanel Margin="15">
		<WrapPanel>
			<TextBlock Text="Window title:  " />
			<TextBox Name="txtWindowTitle" Text="{Binding Title, UpdateSourceTrigger=Explicit}" Width="150" />
			<Button Name="btnUpdateSource" Click="btnUpdateSource_Click" Margin="5,0" Padding="5,0">*</Button>
		</WrapPanel>

		<WrapPanel Margin="0,10,0,0">
			<TextBlock Text="Window dimensions: " />
			<TextBox Text="{Binding Width, UpdateSourceTrigger=LostFocus}" Width="50" />
			<TextBlock Text=" x " />
			<TextBox Text="{Binding Height, UpdateSourceTrigger=PropertyChanged}" Width="50" />
		</WrapPanel>
	</StackPanel>
</Window>
2) code-behind
using System;
using System.Windows;
using System.Windows.Controls;
using System.Windows.Data;

namespace WpfTutorialSamples.DataBinding
{
	public partial class DataContextSample : Window
	{
		public DataContextSample()
		{
			InitializeComponent();
			this.DataContext = this;
		}

		private void btnUpdateSource_Click(object sender, RoutedEventArgs e)
		{
			// 버튼을 누르면 값이 적용되도록 함
			BindingExpression binding = txtWindowTitle.GetBindingExpression(TextBox.TextProperty);
			binding.UpdateSource();
		}
	}
}
3) 결과
- 첫번째 Title은 Explicit으로 설정 -> 직접 업데이트를 수행하지 않으면 내용이 변경되지 않음(버튼을 누르면 변경됨)
- 두번째 Width는 LostFocus로 설정 -> 포커스가 바뀔 때마다 값이 없데이트 됨
- 세번째 Height는 PropertyChanged로 설정 -> 바인딩 속성이 변경될 때마다 즉시 변경됨
1-4. ObservableCollection, INotifyPropertyChanged
[ObservableCollection<T>]
- List<T> 와 역할은 거의 유사
- INotify~ 이렇게 생긴 인터페이스가 상속된 개체들에 변화가 생기면 UI에 알려주어 자동으로 업데이트 시켜줌
[예제]
1) xaml
<Window x:Class="WpfTutorialSamples.DataBinding.ChangeNotificationSample"
        xmlns="http://schemas.microsoft.com/winfx/2006/xaml/presentation"
        xmlns:x="http://schemas.microsoft.com/winfx/2006/xaml"
        Title="ChangeNotificationSample" Height="135" Width="300">
	<DockPanel Margin="10">
		<StackPanel DockPanel.Dock="Right" Margin="10,0,0,0">
			<Button Name="btnAddUser" Click="btnAddUser_Click">Add user</Button>
			<Button Name="btnChangeUser" Click="btnChangeUser_Click" Margin="0,5">Change user</Button>
			<Button Name="btnDeleteUser" Click="btnDeleteUser_Click">Delete user</Button>
		</StackPanel>
		<ListBox Name="lbUsers" DisplayMemberPath="Name"></ListBox>
	</DockPanel>
</Window>
2) code-behind
using System;
using System.Collections.Generic;
using System.Windows;
using System.ComponentModel;
using System.Collections.ObjectModel;
namespace WpfTutorialSamples.DataBinding
{
public partial class ChangeNotificationSample : Window
{
//private List<User> users = new List<User>() // -> UI 갱신이 안됨 -> ObservableCollection 사용
private ObservableCollection<User> users = new ObservableCollection<User>();
public ChangeNotificationSample()
{
InitializeComponent();
users.Add(new User() { Name = "John Doe" });
users.Add(new User() { Name = "Jane Doe" });
lbUsers.ItemsSource = users;
}
private void btnAddUser_Click(object sender, RoutedEventArgs e)
{
users.Add(new User() { Name = "New user" });
}
private void btnChangeUser_Click(object sender, RoutedEventArgs e)
{
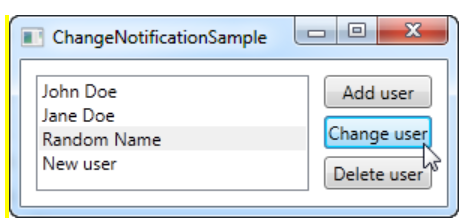
// 선택된 아이템이 있는 경우에만 동작 -> 선택 아이템의 이름 변경
if(lbUsers.SelectedItem != null)
(lbUsers.SelectedItem as User).Name = "Random Name";
}
private void btnDeleteUser_Click(object sender, RoutedEventArgs e)
{
// 선택된 아이템이 있는 경우에만 동작 -> 선택 아이템 삭제
if(lbUsers.SelectedItem != null)
users.Remove(lbUsers.SelectedItem as User);
}
}
public class User : INotifyPropertyChanged
{
private string name;
public string Name {
get { return this.name; }
set
{
if(this.name != value)
{
this.name = value;
this.NotifyPropertyChanged("Name");
}
}
}
public event PropertyChangedEventHandler PropertyChanged;
public void NotifyPropertyChanged(string propName)
{
if(this.PropertyChanged != null)
this.PropertyChanged(this, new PropertyChangedEventArgs(propName));
}
}
}3) 결과
1-5. 값 변환
- 호환되지 않는 데이터를 바인딩 시켜야 할 경우 사용
- 예를 들어, 파일의 크기에 따라 바이트, 킬로바이트, 메가이트 등 단위로 나워 표시 할 경우 또는 체크박스를 값으로 확인하려는데 값이 Boolean 값이 아니라 "yes" "no" 처럼 문자열인 경우 등이 있다.
[예제]
1) xaml
<Window x:Class="WpfTutorialSamples.DataBinding.ConverterSample"
        xmlns="http://schemas.microsoft.com/winfx/2006/xaml/presentation"
        xmlns:x="http://schemas.microsoft.com/winfx/2006/xaml"
		xmlns:local="clr-namespace:WpfTutorialSamples.DataBinding"
        Title="ConverterSample" Height="140" Width="250">
	<Window.Resources>
		<local:YesNoToBooleanConverter x:Key="YesNoToBooleanConverter" />
	</Window.Resources>

	<StackPanel Margin="10">
		<TextBox Name="txtValue" />
		<WrapPanel Margin="0,10">
			<TextBlock Text="Current value is: " />
			<TextBlock Text="{Binding ElementName=txtValue, Path=Text, Converter={StaticResource YesNoToBooleanConverter}}"></TextBlock>
		</WrapPanel>
		<CheckBox IsChecked="{Binding ElementName=txtValue, Path=Text, Converter={StaticResource YesNoToBooleanConverter}}" Content="Yes" />
	</StackPanel>
</Window>
2) code-behind
using System;
using System.Windows;
using System.Windows.Data;

namespace WpfTutorialSamples.DataBinding
{
	public partial class ConverterSample : Window
	{
		public ConverterSample()
		{
			InitializeComponent();
		}
	}

	public class YesNoToBooleanConverter : IValueConverter
	{
		public object Convert(object value, Type targetType, object parameter, System.Globalization.CultureInfo culture)
		{
			switch(value.ToString().ToLower())
			{
				case "yes":
					return true;
				case "no":
					return false;
			}
			return false;
		}

		public object ConvertBack(object value, Type targetType, object parameter, System.Globalization.CultureInfo culture)
		{
			if(value is bool)
			{
				if((bool)value == true)
					return "yes";
				else
					return "no";
			}
			return "no";
		}
	}
}
3) 결과
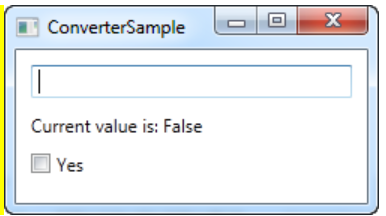
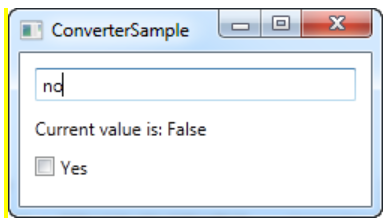
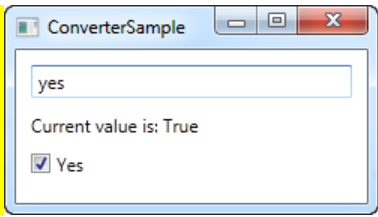
- 문자열을 이용해 체크박스의 값을 변경시키위해 값 변환 IValueConverter를 사용하였다.
1-6. StringFormat property
- 특정 값이 표시되는 방식만 변경하고 다른 유형으로는 변환할 필요가 없는 경우 사용
- 유연성이 다소 떨어지지만 사용이 간편함
[예제]
<Window x:Class="WpfTutorialSamples.DataBinding.StringFormatSample"
        xmlns="http://schemas.microsoft.com/winfx/2006/xaml/presentation"
        xmlns:x="http://schemas.microsoft.com/winfx/2006/xaml"
        <!-- 추가해야함-->
        xmlns:system="clr-namespace:System;assembly=mscorlib"
        Title="StringFormatSample" Height="150" Width="250"
		Name="wnd">
	<StackPanel Margin="10">
		<TextBlock Text="{Binding ElementName=wnd, Path=ActualWidth, StringFormat=Window width: {0:#,#.0}}" />
		<TextBlock Text="{Binding ElementName=wnd, Path=ActualHeight, StringFormat=Window height: {0:C}}" />
		<TextBlock Text="{Binding Source={x:Static system:DateTime.Now}, StringFormat=Date: {0:dddd, MMMM dd}}" />
		<TextBlock Text="{Binding Source={x:Static system:DateTime.Now}, StringFormat=Time: {0:HH:mm}}" />
	</StackPanel>
</Window>
[결과]
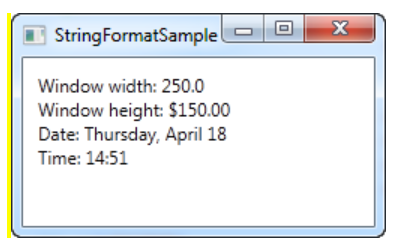
- 첫번째, 두번째는 StringFormat이 Window의 너비와 높이를 바인딩하였고, 형식 문자열을 사용해 출력하였다.
- 세번째, 네번째는 현재 날짜를 가져와 각각 날짜와 시간에 바인딩하여 각각의 형식대로 출력하였다.
2. 커맨드
- 편의성을 위해 쓰는 단축키를 사용할 수 있다.
[예제 1]
1) xaml
<Window x:Class="WpfTutorialSamples.Commands.UsingCommandsSample"
        xmlns="http://schemas.microsoft.com/winfx/2006/xaml/presentation"
        xmlns:x="http://schemas.microsoft.com/winfx/2006/xaml"
        Title="UsingCommandsSample" Height="100" Width="200">
    <Window.CommandBindings>
        <CommandBinding Command="ApplicationCommands.New" Executed="NewCommand_Executed" CanExecute="NewCommand_CanExecute" />
    </Window.CommandBindings>

    <StackPanel HorizontalAlignment="Center" VerticalAlignment="Center">
        <Button Command="ApplicationCommands.New">New</Button>
    </StackPanel>
</Window>
2) code-behind
using System;
using System.Collections.Generic;
using System.Windows;
using System.Windows.Input;

namespace WpfTutorialSamples.Commands
{
	public partial class UsingCommandsSample : Window
	{
		public UsingCommandsSample()
		{
			InitializeComponent();
		}

		private void NewCommand_CanExecute(object sender, CanExecuteRoutedEventArgs e)
		{
			// 아무 동작도 하지 않을 때 특정 커맨드가 사용 가능한지 여부
			e.CanExecute = true;
		}

		private void NewCommand_Executed(object sender, ExecutedRoutedEventArgs e)
		{
			//커맨드가 발동했을 때 동작
			MessageBox.Show("The New command was invoked");
		}
	}
}
3) 결과
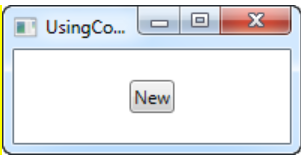
- New 버튼을 눌렀을 때 메세지 창이 뜸
- ApplicationCommands.New이므로 커맨드 버튼인 Ctrl+N을 눌렀을 때도 같은 메세지 창이 뜸
[예제 2]
1) xaml
<Window x:Class="WpfTutorialSamples.Commands.CommandCanExecuteSample"
        xmlns="http://schemas.microsoft.com/winfx/2006/xaml/presentation"
        xmlns:x="http://schemas.microsoft.com/winfx/2006/xaml"
        Title="CommandCanExecuteSample" Height="200" Width="250">

    <Window.CommandBindings>
        <CommandBinding Command="ApplicationCommands.Cut" CanExecute="CutCommand_CanExecute" Executed="CutCommand_Executed" />
        <CommandBinding Command="ApplicationCommands.Paste" CanExecute="PasteCommand_CanExecute" Executed="PasteCommand_Executed" />
    </Window.CommandBindings>

    <DockPanel>
        <WrapPanel DockPanel.Dock="Top" Margin="3">
            <Button Command="ApplicationCommands.Cut" Width="60">_Cut</Button>
            <Button Command="ApplicationCommands.Paste" Width="60" Margin="3,0">_Paste</Button>
        </WrapPanel>

        <TextBox AcceptsReturn="True" Name="txtEditor" />
    </DockPanel>
</Window>
2) code-behind
using System;
using System.Collections.Generic;
using System.Windows;
using System.Windows.Input;

namespace WpfTutorialSamples.Commands
{
	public partial class CommandCanExecuteSample : Window
	{
		public CommandCanExecuteSample()
		{
			InitializeComponent();
		}

		private void CutCommand_CanExecute(object sender, CanExecuteRoutedEventArgs e)
		{
			// 단어가 있고, 해당 단어가 선택된 경우에만 동작
			e.CanExecute = (txtEditor != null) && (txtEditor.SelectionLength > 0);
		}

		private void CutCommand_Executed(object sender, ExecutedRoutedEventArgs e)
		{
			txtEditor.Cut();
		}

		private void PasteCommand_CanExecute(object sender, CanExecuteRoutedEventArgs e)
		{
			e.CanExecute = Clipboard.ContainsText();
		}

		private void PasteCommand_Executed(object sender, ExecutedRoutedEventArgs e)
		{
			txtEditor.Paste();
		}
	}
}
3) 결과
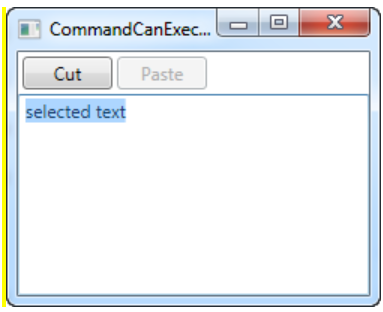
- 단어가 있고, 해당 단어를 아래 그림처럼 드래그해서 선택했을 경우에만 Cut버튼이나 커맨드 키인 Ctrl+X로 동작한다.
- Paste는 Cut한 단어가 있을 경우에만 동작한다.
[예제 3]
<Window x:Class="WpfTutorialSamples.Commands.CommandsWithCommandTargetSample"
        xmlns="http://schemas.microsoft.com/winfx/2006/xaml/presentation"
        xmlns:x="http://schemas.microsoft.com/winfx/2006/xaml"
        Title="CommandsWithCommandTargetSample" Height="200" Width="250">
    <DockPanel>
        <WrapPanel DockPanel.Dock="Top" Margin="3">
            <Button Command="ApplicationCommands.Cut" CommandTarget="{Binding ElementName=txtEditor}" Width="60">_Cut</Button>
            <Button Command="ApplicationCommands.Paste" CommandTarget="{Binding ElementName=txtEditor}" Width="60" Margin="3,0">_Paste</Button>
        </WrapPanel>
        <TextBox AcceptsReturn="True" Name="txtEditor" />
    </DockPanel>
</Window>
[결과]
- 바인딩을 이용해 Code-behind 작성 없이 예제2와 같은 기능을 구현했다.
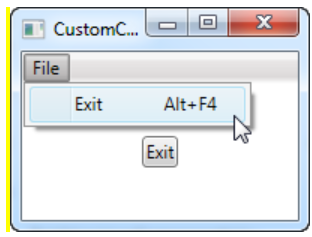
[예제 4] 커스텀 커맨드
1) xaml
<Window x:Class="WpfTutorialSamples.Commands.CustomCommandSample"
        xmlns="http://schemas.microsoft.com/winfx/2006/xaml/presentation"
        xmlns:x="http://schemas.microsoft.com/winfx/2006/xaml"
        xmlns:self="clr-namespace:WpfTutorialSamples.Commands"
        Title="CustomCommandSample" Height="150" Width="200">

    <Window.CommandBindings>
        <CommandBinding Command="self:CustomCommands.Exit" CanExecute="ExitCommand_CanExecute" Executed="ExitCommand_Executed" />
    </Window.CommandBindings>

    <Grid>
        <Grid.RowDefinitions>
            <RowDefinition Height="Auto" />
            <RowDefinition Height="*" />
        </Grid.RowDefinitions>

        <Menu>
            <MenuItem Header="File">
                <MenuItem Command="self:CustomCommands.Exit" />
            </MenuItem>
        </Menu>

        <StackPanel Grid.Row="1" HorizontalAlignment="Center" VerticalAlignment="Center">
            <Button Command="self:CustomCommands.Exit">Exit</Button>
        </StackPanel>
    </Grid>
</Window>
2) code-behind
using System;
using System.Collections.Generic;
using System.Windows;
using System.Windows.Input;

namespace WpfTutorialSamples.Commands
{
	public partial class CustomCommandSample : Window
	{
		public CustomCommandSample()
		{
			InitializeComponent();
		}

		private void ExitCommand_CanExecute(object sender, CanExecuteRoutedEventArgs e)
		{
			e.CanExecute = true;
		}

		private void ExitCommand_Executed(object sender, ExecutedRoutedEventArgs e)
		{
			Application.Current.Shutdown();
		}
	}

	public static class CustomCommands
	{
		public static readonly RoutedUICommand Exit = new RoutedUICommand
			(
				"Exit", "Exit", typeof(CustomCommands),
				new InputGestureCollection()
				{
                	// alt+F4 라는 새로운 커맨드 등록
					new KeyGesture(Key.F4, ModifierKeys.Alt)
				}
			);

		//Define more commands here, just like the one above
	}
}
3) 결과
- 직접 설정한 커맨드를 이용할 수 있다.