1. MessageBox
- 메세지 창을 띄운다.
- 내용 및 제목, ok, yes, no버튼, 기본 버튼 이미지 등을 기본적으로 추가할 수 있다.
[예제]
1) xaml
<Window x:Class="WpfTutorialSamples.Dialogs.MessageBoxSample"
        xmlns="http://schemas.microsoft.com/winfx/2006/xaml/presentation"
        xmlns:x="http://schemas.microsoft.com/winfx/2006/xaml"
        Title="MessageBoxSample" Height="250" Width="300">
    <StackPanel HorizontalAlignment="Center" VerticalAlignment="Center">
        <StackPanel.Resources>
            <Style TargetType="Button">
                <Setter Property="Margin" Value="0,0,0,10" />
            </Style>
        </StackPanel.Resources>
        <Button Name="btnSimpleMessageBox" Click="btnSimpleMessageBox_Click">Simple MessageBox</Button>
        <Button Name="btnMessageBoxWithTitle" Click="btnMessageBoxWithTitle_Click">MessageBox with title</Button>
        <Button Name="btnMessageBoxWithButtons" Click="btnMessageBoxWithButtons_Click">MessageBox with buttons</Button>
        <Button Name="btnMessageBoxWithResponse" Click="btnMessageBoxWithResponse_Click">MessageBox with response</Button>
        <Button Name="btnMessageBoxWithIcon" Click="btnMessageBoxWithIcon_Click">MessageBox with icon</Button>
        <Button Name="btnMessageBoxWithDefaultChoice" Click="btnMessageBoxWithDefaultChoice_Click">MessageBox with default choice</Button>
    </StackPanel>
</Window>
2) code-behind
using System;
using System.Windows;

namespace WpfTutorialSamples.Dialogs
{
	public partial class MessageBoxSample : Window
	{
		public MessageBoxSample()
		{
			InitializeComponent();
		}

		private void btnSimpleMessageBox_Click(object sender, RoutedEventArgs e)
		{
			// 1. 내용 설정
			MessageBox.Show("Hello, world!");
		}

		private void btnMessageBoxWithTitle_Click(object sender, RoutedEventArgs e)
		{
			// 2. 타이틀 설정
			MessageBox.Show("Hello, world!", "My App");
		}

		private void btnMessageBoxWithButtons_Click(object sender, RoutedEventArgs e)
		{
			// 3. 버튼 추가 여부 설정
			MessageBox.Show("This MessageBox has extra options.\n\nHello, world?", "My App", MessageBoxButton.YesNoCancel);
		}

		private void btnMessageBoxWithResponse_Click(object sender, RoutedEventArgs e)
		{
			// 4. 추가 버튼에 따른 선택 내용 설정
			MessageBoxResult result = MessageBox.Show("Would you like to greet the world with a \"Hello, world\"?", "My App", MessageBoxButton.YesNoCancel);
			switch(result)
			{
				case MessageBoxResult.Yes:
					MessageBox.Show("Hello to you too!", "My App");
					break;
				case MessageBoxResult.No:
					MessageBox.Show("Oh well, too bad!", "My App");
					break;
				case MessageBoxResult.Cancel:
					MessageBox.Show("Nevermind then...", "My App");
					break;
			}
		}

		private void btnMessageBoxWithIcon_Click(object sender, RoutedEventArgs e)
		{
			// 5. 아이콘 생성 설정
			MessageBox.Show("Hello, world!", "My App", MessageBoxButton.OK, MessageBoxImage.Information);
		}

		private void btnMessageBoxWithDefaultChoice_Click(object sender, RoutedEventArgs e)
		{
			// 6. 기본 선택값 설정
			MessageBox.Show("Hello, world?", "My App", MessageBoxButton.YesNo, MessageBoxImage.Question, MessageBoxResult.No);
		}
	}
}
3) 결과

2. OpenFileDialog
- 실제 자신의 파일 창을 띄워 내용을 가져올 수 있다.
- 확장자를 이용해 필터를 씌울 수 있다.
- 기본 디렉터리를 설정할 수 있다.
- 여러 파일을 선택할 수 있다.
[예제]
1) xaml
<Window x:Class="WpfTutorialSamples.Dialogs.OpenFileDialogMultipleFilesSample"
        xmlns="http://schemas.microsoft.com/winfx/2006/xaml/presentation"
        xmlns:x="http://schemas.microsoft.com/winfx/2006/xaml"
        Title="OpenFileDialogMultipleFilesSample" Height="300" Width="300">

    <DockPanel Margin="10">
        <WrapPanel HorizontalAlignment="Center" DockPanel.Dock="Top" Margin="0,0,0,10">
            <Button Name="btnOpenFile" Click="btnOpenFiles_Click">Open files</Button>
        </WrapPanel>

        <ListBox Name="lbFiles" />
    </DockPanel>
</Window>
2) code-behind
using System;
using System.IO;
using System.Windows;
using Microsoft.Win32;

namespace WpfTutorialSamples.Dialogs
{
	public partial class OpenFileDialogMultipleFilesSample : Window
	{
		public OpenFileDialogMultipleFilesSample()
		{
			InitializeComponent();
		}

		private void btnOpenFiles_Click(object sender, RoutedEventArgs e)
		{
			OpenFileDialog openFileDialog = new OpenFileDialog();

			// 여러 파일 선택 가능
			openFileDialog.Multiselect = true;
			// 파일 필터 선택
			openFileDialog.Filter = "Text files (*.txt)|*.txt|All files (*.*)|*.*";
			// 기본 디렉터리 설정
			openFileDialog.InitialDirectory = Environment.GetFolderPath(Environment.SpecialFolder.MyDocuments);

			if(openFileDialog.ShowDialog() == true)
			{
				foreach(string filename in openFileDialog.FileNames)
					lbFiles.Items.Add(Path.GetFileName(filename));
			}
		}
	}
}
3) 결과
- 선택한 파일의 파일명을 보여준다.
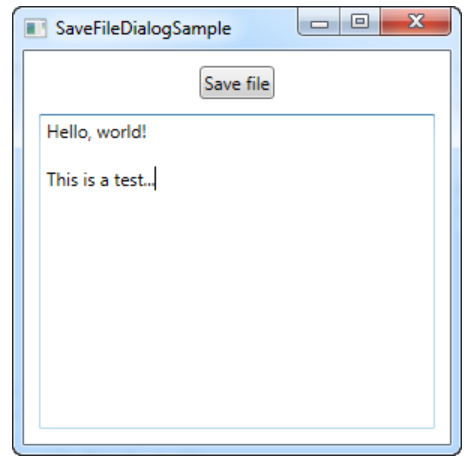
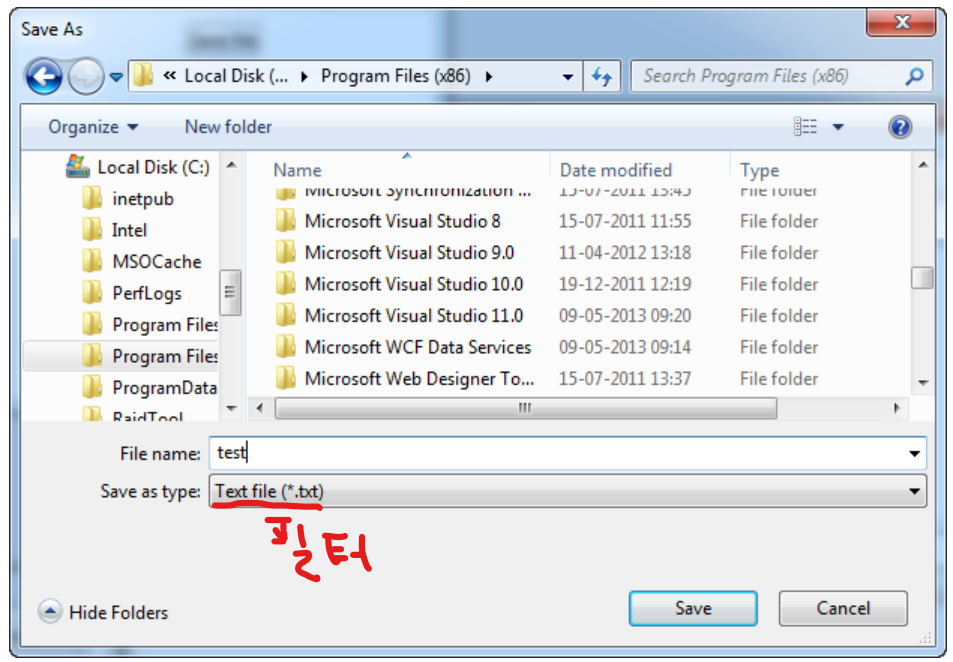
3. SaveFileDialog
- 실제 파일로 저장할 수 있다.
- OpenFileDialog와 마찬가지로 필터와 기본 디렉터리를 설정 가능하다.
[예제]
1) xaml
<Window x:Class="WpfTutorialSamples.Dialogs.SaveFileDialogSample"
        xmlns="http://schemas.microsoft.com/winfx/2006/xaml/presentation"
        xmlns:x="http://schemas.microsoft.com/winfx/2006/xaml"
        Title="SaveFileDialogSample" Height="300" Width="300">

    <DockPanel Margin="10">
        <WrapPanel HorizontalAlignment="Center" DockPanel.Dock="Top" Margin="0,0,0,10">
            <Button Name="btnSaveFile" Click="btnSaveFile_Click">Save file</Button>
        </WrapPanel>

        <TextBox Name="txtEditor" TextWrapping="Wrap" AcceptsReturn="True" ScrollViewer.VerticalScrollBarVisibility="Auto" />
    </DockPanel>
</Window>
2) code-behind
using System;
using System.IO;
using System.Windows;
using Microsoft.Win32;

namespace WpfTutorialSamples.Dialogs
{
	public partial class SaveFileDialogSample : Window
	{
		public SaveFileDialogSample()
		{
			InitializeComponent();
		}

		private void btnSaveFile_Click(object sender, RoutedEventArgs e)
		{
			SaveFileDialog saveFileDialog = new SaveFileDialog();

			// 필터 사용
			saveFileDialog.Filter = "Text file (*.txt)|*.txt|C# file (*.cs)|*.cs";

			if(saveFileDialog.ShowDialog() == true)
				File.WriteAllText(saveFileDialog.FileName, txtEditor.Text);
		}
	}
}
3) 결과
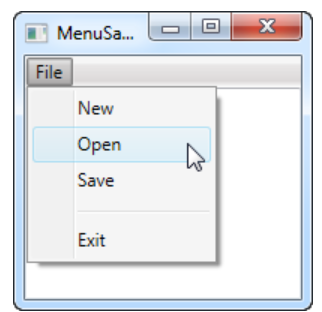
4. Menu Control
- 메인메뉴라고 불리는 부분으로 일반적으로 하나만 있을 수 있음
[예제 1]
<Window x:Class="WpfTutorialSamples.Common_interface_controls.MenuSample"
        xmlns="http://schemas.microsoft.com/winfx/2006/xaml/presentation"
        xmlns:x="http://schemas.microsoft.com/winfx/2006/xaml"
        Title="MenuSample" Height="200" Width="200">

    <DockPanel>
        <Menu DockPanel.Dock="Top">
            <MenuItem Header="_File">
                <MenuItem Header="_New" />
                <MenuItem Header="_Open" />
                <MenuItem Header="_Save" />
                <Separator />
                <MenuItem Header="_Exit" />
            </MenuItem>
        </Menu>

        <TextBox AcceptsReturn="True" />
    </DockPanel>
</Window>
[결과]
- 앞에 언더스코어(_)를 붙임으로써 hot key의 역할을 수행할 수 있다.
[예제 2]
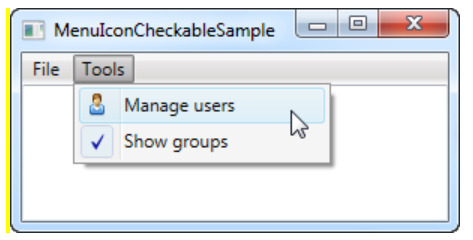
<Window x:Class="WpfTutorialSamples.Common_interface_controls.MenuIconCheckableSample"
        xmlns="http://schemas.microsoft.com/winfx/2006/xaml/presentation"
        xmlns:x="http://schemas.microsoft.com/winfx/2006/xaml"
        Title="MenuIconCheckableSample" Height="150" Width="300">

    <DockPanel>
        <Menu DockPanel.Dock="Top">

            <MenuItem Header="_File">
                <MenuItem Header="_Exit" />
            </MenuItem>

            <MenuItem Header="_Tools">
                <MenuItem Header="_Manage users">
                    <MenuItem.Icon> <!--아이콘 생성-->
                        <Image Source="/WpfTutorialSamples;component/Images/user.png" />
                    </MenuItem.Icon>
                </MenuItem>

                <!--체크박스 설정-->
                <MenuItem Header="_Show groups" IsCheckable="True" IsChecked="True" />
            </MenuItem>
        </Menu>

        <TextBox AcceptsReturn="True" />
    </DockPanel>
</Window>
[결과]
- 아이콘 및 체크상자의 속성을 넣을 수 있었다.
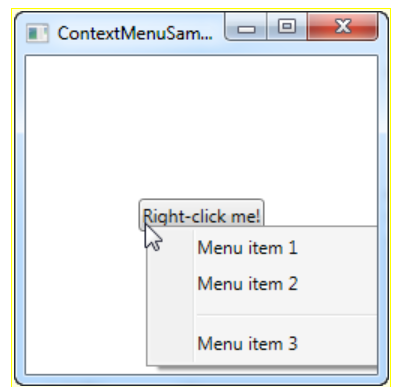
5. ContextMenu
- 특정한 유저의 행동헤 따라 표시되는 메뉴
- 주로 마우스 오른쪽 클릭을 할 때 사용
[예제]
1) xaml
<Window x:Class="WpfTutorialSamples.Common_interface_controls.ContextMenuSample"
        xmlns="http://schemas.microsoft.com/winfx/2006/xaml/presentation"
        xmlns:x="http://schemas.microsoft.com/winfx/2006/xaml"
        Title="ContextMenuSample" Height="250" Width="250">

    <Grid>
        <Button Content="Right-click me!" VerticalAlignment="Center" HorizontalAlignment="Center">
            <Button.ContextMenu>
                <ContextMenu>
                    <MenuItem Header="Menu item 1" />
                    <MenuItem Header="Menu item 2" />
                    <Separator />
                    <MenuItem Header="Menu item 3" />
                </ContextMenu>
            </Button.ContextMenu>
        </Button>
    </Grid>
</Window>
[결과]
- 버튼을 오른쪽 클릭시 해당 메뉴들이 생성된다.
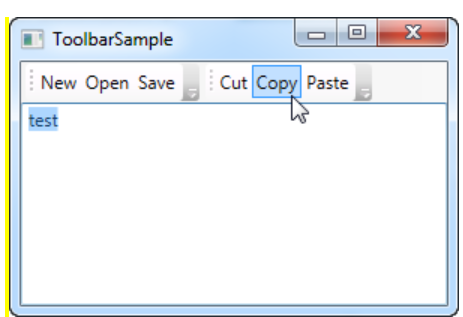
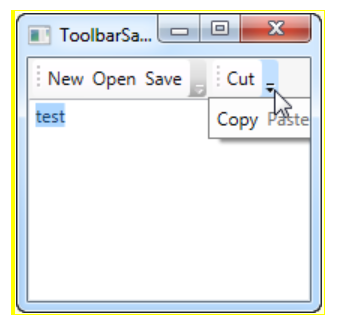
6. ToolBar
- 주 메뉴 바로 아래에 있는 명령들
[예제]
1) xaml
<Window x:Class="WpfTutorialSamples.Common_interface_controls.ToolbarSample"
        xmlns="http://schemas.microsoft.com/winfx/2006/xaml/presentation"
        xmlns:x="http://schemas.microsoft.com/winfx/2006/xaml"
        Title="ToolbarSample" Height="200" Width="300">

    <Window.CommandBindings>
        <CommandBinding Command="New" CanExecute="CommonCommandBinding_CanExecute" />
        <CommandBinding Command="Open" CanExecute="CommonCommandBinding_CanExecute" />
        <CommandBinding Command="Save" CanExecute="CommonCommandBinding_CanExecute" />
    </Window.CommandBindings>

    <DockPanel>
        <ToolBarTray DockPanel.Dock="Top">
            <ToolBar>
                <Button Command="New" Content="New" />
                <Button Command="Open" Content="Open" />
                <Button Command="Save" Content="Save" />
            </ToolBar>

            <ToolBar>
                <Button Command="Cut" Content="Cut" />
                <Button Command="Copy" Content="Copy" />
                <Button Command="Paste" Content="Paste" />
            </ToolBar>
        </ToolBarTray>
        <TextBox AcceptsReturn="True" />
    </DockPanel>
</Window>
2) code-behind
using System;
using System.Windows;
using System.Windows.Input;

namespace WpfTutorialSamples.Common_interface_controls
{
	public partial class ToolbarSample : Window
	{
		public ToolbarSample()
		{
			InitializeComponent();
		}

		private void CommonCommandBinding_CanExecute(object sender, CanExecuteRoutedEventArgs e)
		{
			e.CanExecute = true;
		}
	}
}
3) 결과
- 툴바가 생성되어 위치를 이동시킬 수 있음
- 버튼들이 윈도우 창을 넘어가면 자동으로 오버플로 처리가 된다.
- 오버플로는 ToolBar.OverflowMode 속성을 이용해 조절 가능함(Always, AsNeeded, Never)
7. StatusBar
- 상태 표시 기능을 나타낸다.
[예제 1]
1) xaml
<Window x:Class="WpfTutorialSamples.Common_interface_controls.StatusBarSample"
        xmlns="http://schemas.microsoft.com/winfx/2006/xaml/presentation"
        xmlns:x="http://schemas.microsoft.com/winfx/2006/xaml"
        Title="StatusBarSample" Height="150" Width="300">
	<DockPanel>
		<StatusBar DockPanel.Dock="Bottom">
			<StatusBarItem>
				<TextBlock Name="lblCursorPosition" />
			</StatusBarItem>
		</StatusBar>
		<TextBox AcceptsReturn="True" Name="txtEditor" SelectionChanged="txtEditor_SelectionChanged" />
	</DockPanel>
</Window>
2) code-behind
using System;
using System.Windows;
namespace WpfTutorialSamples.Common_interface_controls
{
public partial class StatusBarSample : Window
{
public StatusBarSample()
{
InitializeComponent();
}
private void txtEditor_SelectionChanged(object sender, RoutedEventArgs e)
{
int row = txtEditor.GetLineIndexFromCharacterIndex(txtEditor.CaretIndex);
int col = txtEditor.CaretIndex - txtEditor.GetCharacterIndexFromLineIndex(row);
// 열의 갯수와 행 별 단어 개수를 표시
lblCursorPosition.Text = "Line " + (row + 1) + ", Char " + (col + 1);
}
}
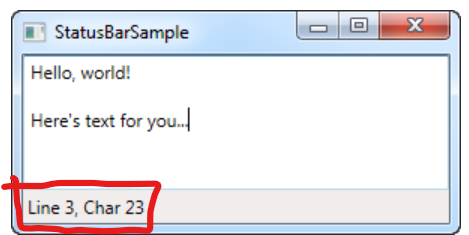
}3) 결과
- 하단 상태표시줄에 열의 갯수와, 현재 행의 단어의 갯수를 표시해준다.
[예제 2]
1) xaml
<Window x:Class="WpfTutorialSamples.Common_interface_controls.StatusBarAdvancedSample"
        xmlns="http://schemas.microsoft.com/winfx/2006/xaml/presentation"
        xmlns:x="http://schemas.microsoft.com/winfx/2006/xaml"
        Title="StatusBarAdvancedSample" Height="150" Width="400">

    <DockPanel>
        <StatusBar DockPanel.Dock="Bottom">
            <StatusBar.ItemsPanel>
                <ItemsPanelTemplate>
                    <Grid>
                    <!--5개의 열 표현 방식 정의-->
                        <Grid.ColumnDefinitions>
                            <ColumnDefinition Width="100" />
                            <ColumnDefinition Width="Auto" />
                            <ColumnDefinition Width="*" />
                            <ColumnDefinition Width="Auto" />
                            <ColumnDefinition Width="100" />
                        </Grid.ColumnDefinitions>
                    </Grid>
                </ItemsPanelTemplate>
            </StatusBar.ItemsPanel>

            <!--상태 표시줄의 첫번째 내용-->
            <StatusBarItem>
                <TextBlock Name="lblCursorPosition" />
            </StatusBarItem>

            <Separator Grid.Column="1" />

            <!--상태 표시줄의 두번째 내용-->
            <StatusBarItem Grid.Column="2">
                <TextBlock Text="c:\path\of\current\file.txt" />
            </StatusBarItem>

            <Separator Grid.Column="3" />

            <!--상태 표시줄의 세번째 내용-->
            <StatusBarItem Grid.Column="4">
                <ProgressBar Value="50" Width="90" Height="16" />
            </StatusBarItem>
        </StatusBar>

        <TextBox AcceptsReturn="True" Name="txtEditor" SelectionChanged="txtEditor_SelectionChanged" />
    </DockPanel>
</Window>
2) code-behind
using System;
using System.Windows;
namespace WpfTutorialSamples.Common_interface_controls
{
public partial class StatusBarAdvancedSample : Window
{
public StatusBarAdvancedSample()
{
InitializeComponent();
}
private void txtEditor_SelectionChanged(object sender, RoutedEventArgs e)
{
int row = txtEditor.GetLineIndexFromCharacterIndex(txtEditor.CaretIndex);
int col = txtEditor.CaretIndex - txtEditor.GetCharacterIndexFromLineIndex(row);
// 열의 갯수, 현재 행의 단어 갯수 출력
lblCursorPosition.Text = "Line " + (row + 1) + ", Char " + (col + 1);
}
}
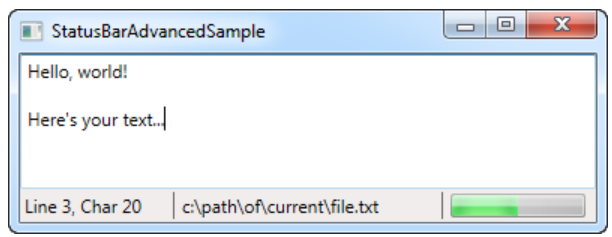
}3) 결과
8. FlowDocumentScrollViewer
- 스크롤 막대와 같은 작업을 할 때 사용
[예제 1]
<Window x:Class="WpfTutorialSamples.Rich_text_controls.FlowDocumentScrollViewerSample"
xmlns="http://schemas.microsoft.com/winfx/2006/xaml/presentation"
xmlns:x="http://schemas.microsoft.com/winfx/2006/xaml"
Title="FlowDocumentScrollViewerSample" Height="200" Width="300">
<Grid>
<FlowDocumentScrollViewer>
<FlowDocument>
<Paragraph FontSize="36">Hello, world!</Paragraph>
<Paragraph FontStyle="Italic" TextAlignment="Left" FontSize="14" Foreground="Gray">The ultimate programming greeting!</Paragraph>
</FlowDocument>
</FlowDocumentScrollViewer>
</Grid>
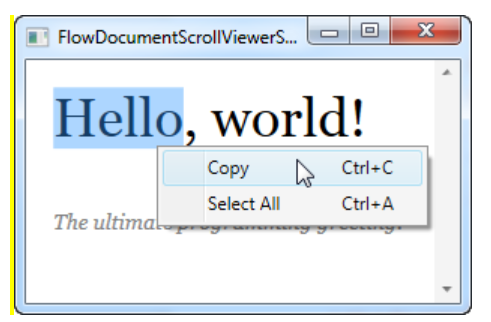
</Window>[결과]
- Paragraph를 사용하면 기본적인 것들이 구현되어 있어 편함
[예제 2]
Download & run this example
<Window x:Class="WpfTutorialSamples.Rich_text_controls.FlowDocumentScrollViewerZoomSample"
xmlns="http://schemas.microsoft.com/winfx/2006/xaml/presentation"
xmlns:x="http://schemas.microsoft.com/winfx/2006/xaml"
Title="FlowDocumentScrollViewerZoomSample" Height="180" Width="300">
<Grid>
<FlowDocumentScrollViewer IsToolBarVisible="True" Zoom="80" ScrollViewer.VerticalScrollBarVisibility="Auto">
<FlowDocument>
<Paragraph FontSize="36">Hello, world!</Paragraph>
<Paragraph FontStyle="Italic" TextAlignment="Left" FontSize="14" Foreground="Gray">The ultimate programming greeting!</Paragraph>
</FlowDocument>
</FlowDocumentScrollViewer>
</Grid>
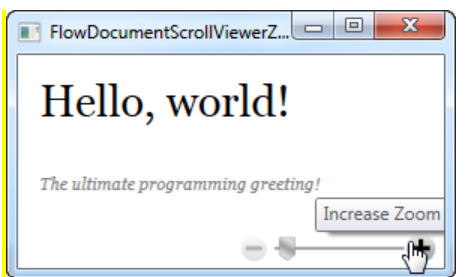
</Window>[결과]
- Zoom 속성을 사용할 수 있음
- Ctrl + 휠을 이용해 조절도 가능
[예제 3]
<Window x:Class="WpfTutorialSamples.Rich_text_controls.FlowDocumentTextAlignmentSample"
        xmlns="http://schemas.microsoft.com/winfx/2006/xaml/presentation"
        xmlns:x="http://schemas.microsoft.com/winfx/2006/xaml"
        Title="FlowDocumentTextAlignmentSample" Height="400" Width="330">

    <StackPanel>
        <FlowDocumentScrollViewer ScrollViewer.VerticalScrollBarVisibility="Auto">
            <FlowDocument>
                <Paragraph FontStyle="Italic" FontSize="14" Foreground="Gray">
                    By setting the
                    <Bold>IsOptimalParagraphEnabled</Bold> property to true,
                    you will allow WPF to look ahead on the lines to come, before deciding
                    where to break. This will usually result in a more pleasant reading
                    experience. It works especially well in combination with the
                    <Bold>IsHyphenationEnabled</Bold> property.
                </Paragraph>
            </FlowDocument>
        </FlowDocumentScrollViewer>

        <FlowDocumentScrollViewer ScrollViewer.VerticalScrollBarVisibility="Auto">
            <FlowDocument IsOptimalParagraphEnabled="True" IsHyphenationEnabled="True">
                <Paragraph FontStyle="Italic" FontSize="14" Foreground="Gray">
                    By setting the <Bold>IsOptimalParagraphEnabled</Bold> property to true,
                    you will allow WPF to look ahead on the lines to come, before deciding
                    where to break. This will usually result in a more pleasant reading
                    experience. It works especially well in combination with the
                    <Bold>IsHyphenationEnabled</Bold> property.
                </Paragraph>
            </FlowDocument>
        </FlowDocumentScrollViewer>
    </StackPanel>
</Window>
[결과]
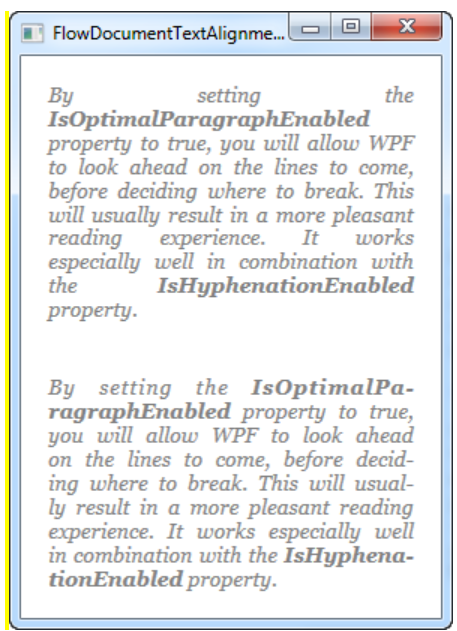
- TextAlignment : 텍스트 정렬 방법 설정
- IsOptimalParagraphEnabled : 텍스트의 공간을 최적으로 활용하게 해줌
- IsHyphenationEnabled : 이어진 단어가 문단을 넘어갈 때 하이픈을 사용해 이어줌
[cf]
- App.xaml에서 위의 스타일 설정을 전역으로 해줄 수 있음
<Application x:Class="WpfTutorialSamples.App"
             xmlns="http://schemas.microsoft.com/winfx/2006/xaml/presentation"
             xmlns:x="http://schemas.microsoft.com/winfx/2006/xaml"
             xmlns:sys="clr-namespace:System;assembly=mscorlib"
             StartupUri="Rich text controls/FlowDocumentTextAlignmentSample.xaml">
    <Application.Resources>
        <Style TargetType="FlowDocument">
            <Setter Property="IsOptimalParagraphEnabled" Value="True" />
            <Setter Property="IsHyphenationEnabled" Value="True" />
        </Style>
    </Application.Resources>
</Application>
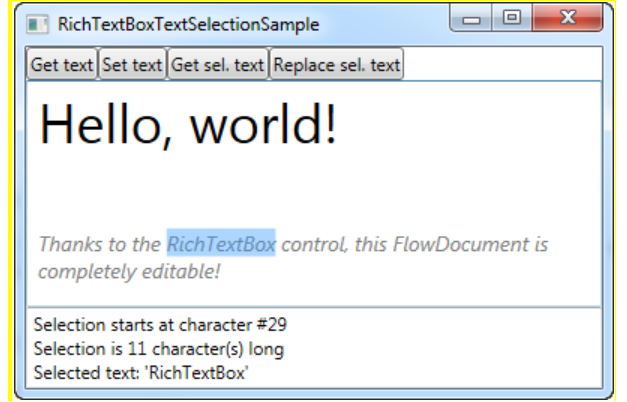
9. RichTextBox
- 기본 TextBox보다 Document를 만들 때 편리한 것들이 기본 내장되어 있다.
[예제]
1) xaml
<Window x:Class="WpfTutorialSamples.Rich_text_controls.RichTextBoxTextSelectionSample"
        xmlns="http://schemas.microsoft.com/winfx/2006/xaml/presentation"
        xmlns:x="http://schemas.microsoft.com/winfx/2006/xaml"
        Title="RichTextBoxTextSelectionSample" Height="300" Width="400">
    <DockPanel>
        <WrapPanel DockPanel.Dock="Top">
            <Button Name="btnGetText" Click="btnGetText_Click">Get text</Button>
            <Button Name="btnSetText" Click="btnSetText_Click">Set text</Button>
            <Button Name="btnGetSelectedText" Click="btnGetSelectedText_Click">Get sel. text</Button>
            <Button Name="btnSetSelectedText" Click="btnSetSelectedText_Click">Replace sel. text</Button>
        </WrapPanel>
        <TextBox DockPanel.Dock="Bottom" Name="txtStatus" />
        <RichTextBox Name="rtbEditor" SelectionChanged="rtbEditor_SelectionChanged">
            <FlowDocument>
                <Paragraph FontSize="36">Hello, world!</Paragraph>
                <Paragraph FontStyle="Italic" TextAlignment="Left" FontSize="14" Foreground="Gray">Thanks to the RichTextBox control, this FlowDocument is completely editable!</Paragraph>
            </FlowDocument>
        </RichTextBox>
    </DockPanel>
</Window>
2) code-behind
using System;
using System.Windows;
using System.Windows.Controls;
using System.Windows.Documents;

namespace WpfTutorialSamples.Rich_text_controls
{
	public partial class RichTextBoxTextSelectionSample : Window
	{
		public RichTextBoxTextSelectionSample()
		{
			InitializeComponent();
		}

		private void btnGetText_Click(object sender, RoutedEventArgs e)
		{
			TextRange textRange = new TextRange(rtbEditor.Document.ContentStart, rtbEditor.Document.ContentEnd);
			MessageBox.Show(textRange.Text);
		}

		private void btnSetText_Click(object sender, RoutedEventArgs e)
		{
			TextRange textRange = new TextRange(rtbEditor.Document.ContentStart, rtbEditor.Document.ContentEnd);
			textRange.Text = "Another world, another text!";
		}

		private void btnGetSelectedText_Click(object sender, RoutedEventArgs e)
		{
			MessageBox.Show(rtbEditor.Selection.Text);
		}

		private void btnSetSelectedText_Click(object sender, RoutedEventArgs e)
		{
			rtbEditor.Selection.Text = "[Replaced text]";
		}

		private void rtbEditor_SelectionChanged(object sender, RoutedEventArgs e)
		{
			TextRange tempRange = new TextRange(rtbEditor.Document.ContentStart, rtbEditor.Selection.Start);
			txtStatus.Text = "Selection starts at character #" + tempRange.Text.Length + Environment.NewLine;
			txtStatus.Text += "Selection is " + rtbEditor.Selection.Text.Length + " character(s) long" + Environment.NewLine;
			txtStatus.Text += "Selected text: '" + rtbEditor.Selection.Text + "'";
		}
	}
}
3) 결과
- get : 현재 입력 되어있는 문장을 출력
- set : 현재 입력 되어있는 문장을 지우고 저장 되어있는 문장으로 대체
- get select : 현재 선택 되어있는 문장을 출력
- set select : 현재 선택 되어있는 문장을 저장 되어있는 다른 문자으로 대체